Here’s a Quick Setup Guide for Dual-PC use of SimTools:
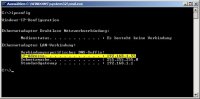
[Windows key]-R → type cmd → on the prompt type ipconfig → read the the ip address
[GARD]


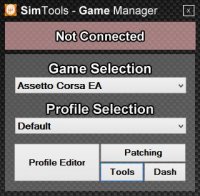
Game Manager
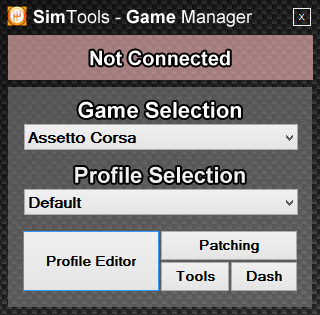
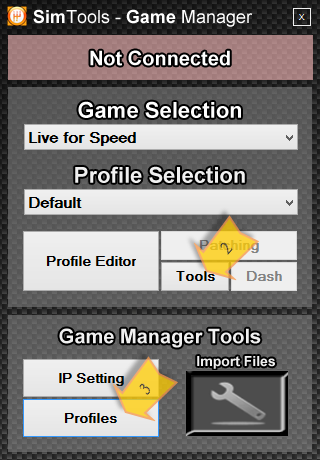
The game manager has three states that it can be in and is displayed in the top bar as follows:
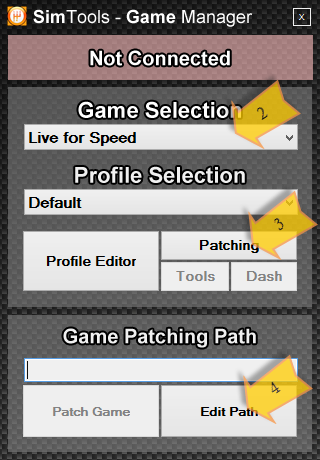
· Not Connect – (red) which states that the game manager is not connected to the game engine, normally meaning the game engine is not running, please start the game engine and it will then automatically connect itself.
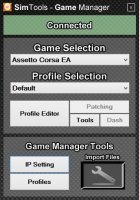
· Connected – (green) which states it is connected to the game engine and is ready to go.
· Game Running– (blue) this states that it has connected successfully with a game plugin and is sending data to the game engine which in turn will be sending data to the interfaces if you have set them correctly.
These three states help you recognize what process step the Game Manager is in.
In order to use the plugins we have previously installed with the SimTools Game Plugin Updater we must patch the game for motion. Here we will just set the game plugin that comes supplied with SimTools before we had installed any other plugins in Resource section on the website with information on the directory you need to select in order to successfully patch the game for motion.
To patch Live for Speedtm we do as follows:
You will now notice another window open as asks you to select the Live for Speeds installation directory.
This can now be repeated for each game you have installed via the Plugin Updater.
Please note if you change the game plugin or update the game plugin you will need to first remove the patch as follows:
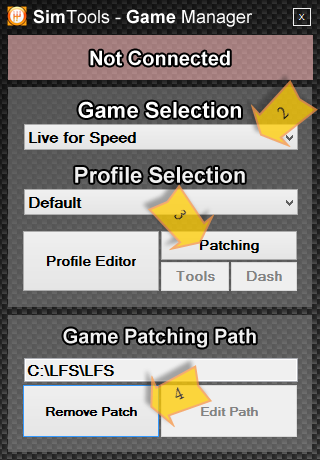
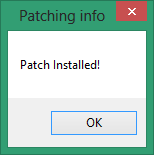
On pressing Remove Patch you will be asked to confirm that you want to Remove the Patch for Motion ‘Live for Speed’? Select Ok to continue. Again a confirmation like below lets you know that the operation was a success. Press Ok to complete this and you will now see that in the Game Patching Path is now not set and the Edit Path button is now selectable.
Now you are free to update the game plugin via the SimTools Game Plugin Updater.
Once of the nice things that the Game Manager allows us to do is if we have followed all the right instructions in the setting up of the Game Engine, mainly setting up the default profile correctly.
We can now modify the profile without leaving the game. This is best done with the game in a window and the Game Manager open next to it.
With the Game Manager open:
A new window will pop up and this is where we can create and save custom profiles on the fly.

You will then notice there is a button box labelled on the top which contains:
In this section it is split up into three areas, all serve their own functions, first on the top is a nice banner showing the Game Plugin selected plus in the upper right corner is the name of the people(s) responsible for writing the actual game plugin. A nice way to say thank you. The second area labelled Main Setting is where you can select a game plugin, a quick way of moving through the game plugins that are installed. Press the down arrow and a list of game plugins installed will appear, simply pick the game plugin you want from the list and watch the banner change and now you can work with that one. The Main Level % can be used to lessen the overall movement of the sim. Simply move this slider and the percent will represent the overall used by the Game Engine to drive your simulator. Thirdly the bottom section shows the forces available in the plugin, if your wonder what forces you need to setup in the Axis Assignment this will show you.
Now to actually edit a profile:
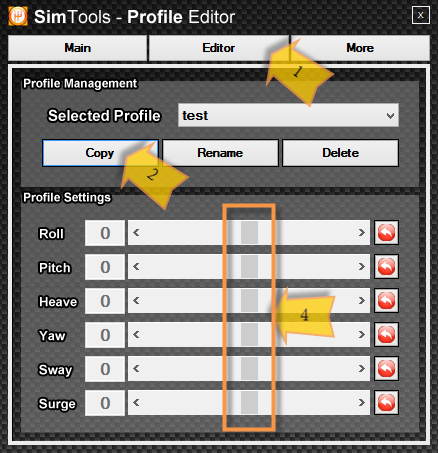
Your custom profile is now ready and can be selected on the fly in the front page of the Game Manager. Now for any reason you don’t like this, you simply press Delete and it is removed, on the other hand if it’s just the name you don’t like press Rename and give it a better name.
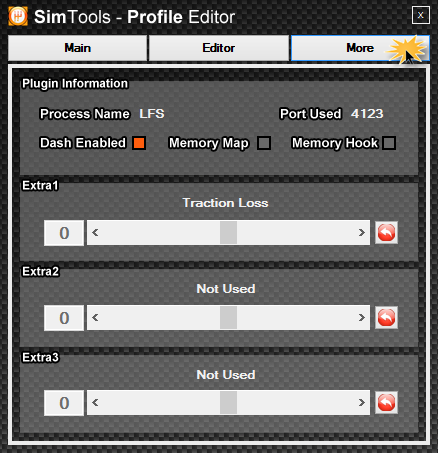
In this panel we can check what is contained within the game plugin. As per the picture below you will notice in the top area named Plugin Information it has:
· Process Name – This is the name that appears in the process section of the task manager for Windows and if you Game Manager will not patch the game please check here and you can see if the actual game exe name is different, please if this found to be true, report the details to the game plugin creator so he/she may update this for you and any other user in the future. SimTools grows with help of its users.
· Port Used – is the UDP port that the Game Plugin uses to send the data too, if your data doesn’t seem to be passing to the Tuning Centre and the Game Manager’s status is Blue with Game Running, you may have to exclude this port from your firewall software.
· The next three check boxes – If checked (orange dot) shows how they obtain their data as well whether they support the Dash Out data for Dashboard Support.
The next three sliders that follow the above information are the Extra Forces that may be available in each game plugin and can be dealt with the same and do save in the editor if you are changing them for the default profile or a custom one you have created.
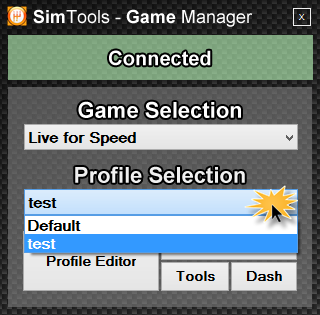
There comes a time when the default motion profile does not suit the car or plane we have change too, so instead of going through the lengthy process of tuning a profile again we can do as explained in the above section of the Profile Editor. Now we can quickly change our profile without ending the game. We can simply select the profile in the front screen of the Game Manager under Profile Selection, and the Game Engine automatically picks this up for us and modifies the values accordingly, without you worrying about it. Which allows you to go straight back to enjoying your favorite game.
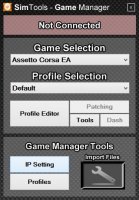
Include in the Game Manager is a list of tools, their functions are as follows:
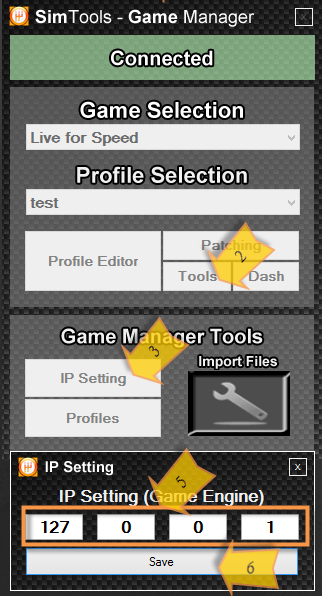
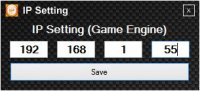
Note that if this game is already patched you will have to later follow these instructions in order for motion to be present from this game again. Please stop the game after changing the IP Setting and Un-Patch and Re-Patch the game again, Thank you.
Here you can gain access to copy your profiles so they may be posted to a web site or attached to an email in order to send them to someone.
Please note if you do not copy and just move them you will no longer be able to use them anymore. Please be carefully.
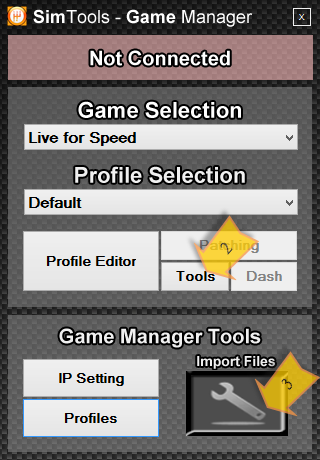
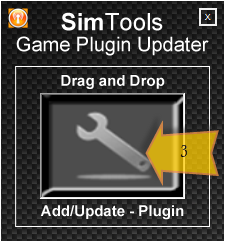
Now you have received a Game Manager profile from somebody, What do we do with it? Well with in the Game Manager we have a simply drag and drop box to import such files.
Now we can simply drag and drop the supplied Game Manager Profile to the Import Files box (3.) And the Game Manger will then install this to the right place ready for you to use it.
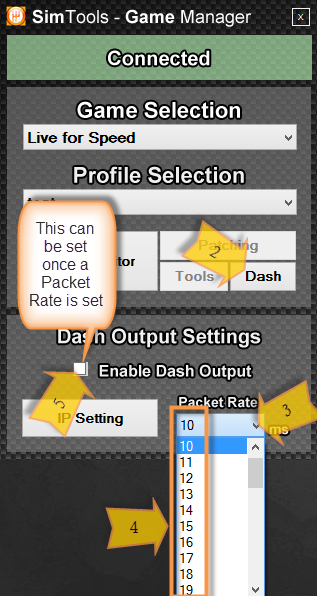
With the Dash Output settings you to set the pack rate for the data being sent to the Game Dash to send it to the micro controller or peripheral it communicates with, as well as setting the IP address if this is connected to a different computer on your network.
Here if the dashboard or peripheral is located on your network, for example is run of a second computer. You need to change the IP Setting in the Dash.
Now the Game Manager knows which IP Address to send the Dash data too.
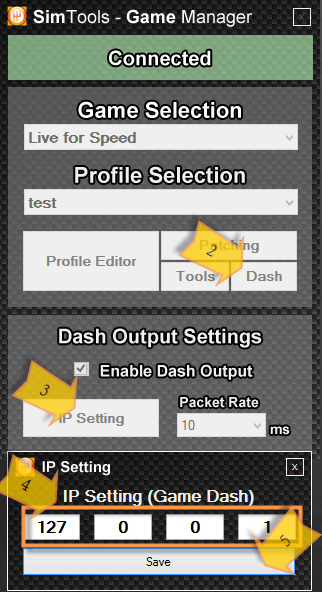
Now with the packet rate is the time that the dash out pauses between sending the data to the Game Dash .This in turn give the Game Dash time to do what it needs to do before another set of values are sent and is needed in order to keep a nice constant flow of data. As well when not set the Enable Dash Output will not be able to be selected.
To set the packet rate desired.
Now that the packet rate is selected at any time you wish to stop or start the dash output it can be controlled by checking the Enable Dash Output box. And if it seems the Game Dash is not coping with the speed of the packet rate this too can be adjusted to a higher number in order for the Game Dash to cope better.
With credit to Value1 he has set in place a Standard Co- Ordinate system for our game plugins. For example all game plugins should move the slider in the same directions.
All information is taken from:
http://www.xsimulator.net/community/threads/plugin-api-for-simtools-3-0.4612/
Nomenclature of movements in SimTools
Pitch is the tilt of the car forwards or backwards in [°]
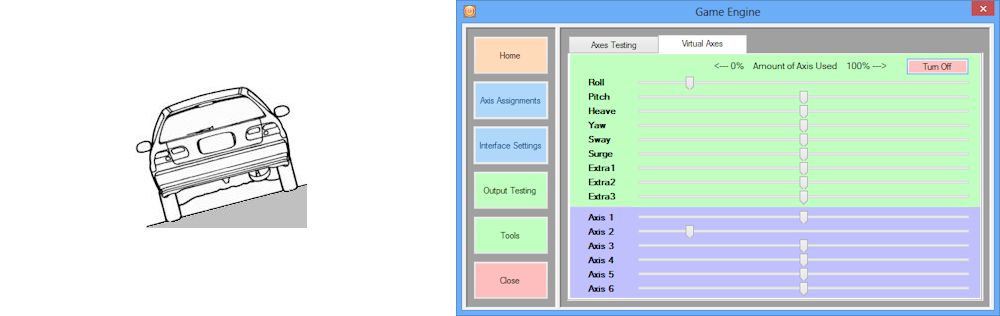
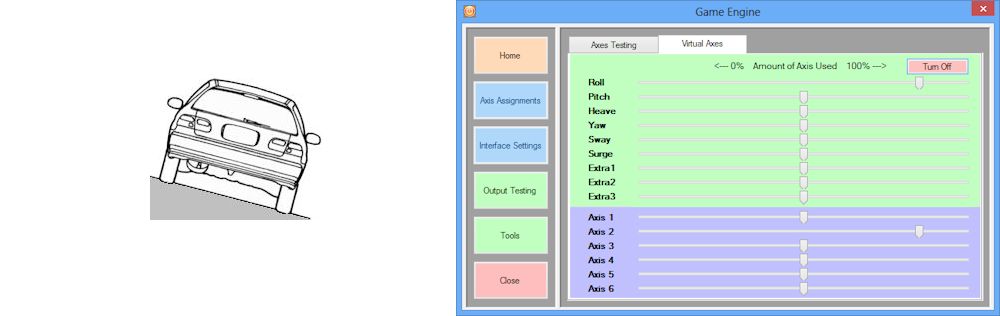
Roll is how much the car is dipped to the left or right in [°]
Yaw is the heading of the car (north, east, south, west) in [°]
Surge means the acceleration of the car in longitudinal direction [g]
Sway means the acceleration of the car in lateral direction [g]
Heave means the acceleration up and down [g]
Acceleration → pitch slider moves to left, surge slider moves to right
Deceleration (braking) → pitch slider moves to right, surge slider moves to left
Right turn → roll slider moves to left, sway slider moves to right, yaw slider moves to left

Left turn → roll slider moves to right, sway slider moves to left, yaw slider moves to right.
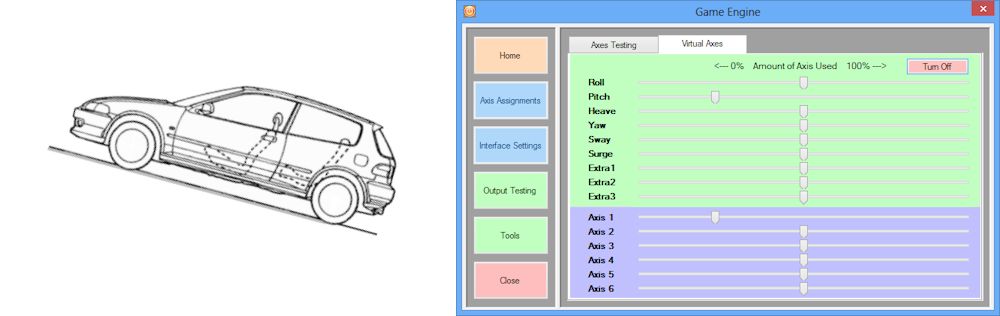
Driving downhill → pitch slider moves to right
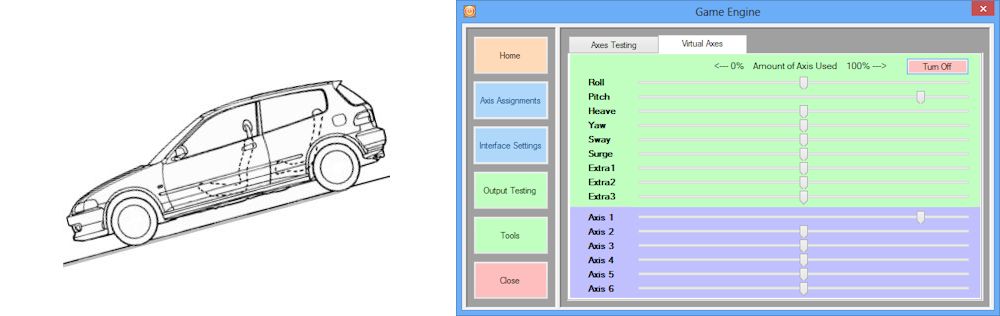
Driving uphill → pitch slider moves to left
Tilted to the left → roll slider moves to left
Tilted to the right → roll slider moves to right
[gard]
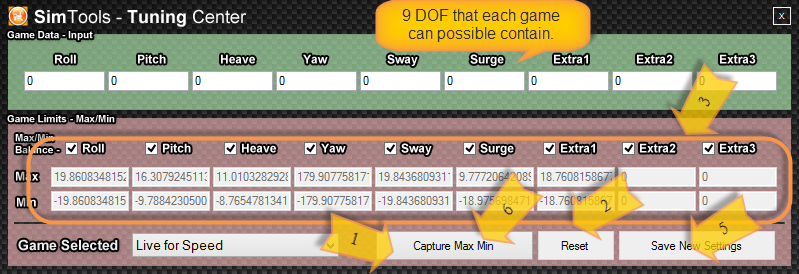
Tuning the Min/Max values of a game for your simulator ensures that the motion you output to your simulator is the best it can be! Right click on the Game Engine Icon in the system tray and then select Tuning Center from the popup menu. You only need to do this once per game.
The tuning window allows you to set the Max and Min values that will be used by Game Engine to calculate how much of the axis is used. It does this by comparing the incoming value with either the Max or the Min value and then calculates the correct percentage needed for output.
Each game plug-in allows for up to 9 DOF’s (degree of force) to be sent and used for output to your simulator. Roll, Pitch, Heave, Yaw, Sway, Surge, Extra1, Extra2 and Extra3. Each of these 9 DOF’s that’s used for the specific game plug-in should have a corresponding Max/Min value.
Increasing the Min/Max values to higher numbers will result in less movement, i.e. will seldom reach its max or min value resulting in less overall movement but will have more range or output. Decreasing the Min/Max values and we end up reaching those Min/Max settings a lot quicker resulting in faster and snapper movements but with less overall range for output.
To capture new Max/Min values with the Tuning Centre:
Start the game you want to capture new Max/Min limits for. I would suggest that if you can, used a medium car on a medium track.
If at any time you feel like you want to start over, simply install the original plugin again with the SimTools Plugin Updater.
[gard]
SimTools Game Plugin Updater was created to make life easier for the end user to install a game plugin and not have to worry about were the files need to be place in order for them to work correctly.
[gard]
First of all make sure the Game Engine and the Game Manager are not running in the system tray or the plugin updater will not start and warn you that they are still running.
Now the plugin should be left as they were downloaded from the Resource Section of the website and do not need to be uncompressed in order for them to install properly.
You now should receive a message stating the plugin was valid and installed. This game will now be able to be used in the game manager.
Here in the Home Screen we can set a picture of our simulator or a picture to make our setup look personal to our tastes.
Now your Home Screen should have your picture now showing and will stay this way until you either change this or reset it with:
Which will then clear the picture.
The axis used by the Game Engine are important to setup correctly as this will decide how your simulator will act to the input coming from the Game Manager.
You can gain access to these by pressing the button marked Axis Assignments located on the top line.
Looking at this page you will notice on the left hand side a list of Axis 1 through to 6; these are the Axis that you may setup to be used by the Interfaces that you will select in Interface settings. They represent the actuators/motors within you simulator as you may guess for a 2 DOF unit you will setup two axes and so on to a 6 DOF unit where you will setup all six axis.
In the center box is a list of DOF which allows you set the forces you wish to act on each axis and can be a collection of up to six allowing for a very complicated axis profile to be easily written. Along with just selecting the forces to use you can apply filters and the % of the total axis movement to be used by each force.
For now we will setup the default axis as this is the most important one to setup first before moving on and installing any game plugin.
It is recommended that we first setup our Axis, to test the simulator before testing any game output. So when we actually test a game we only have to fine tune the result.
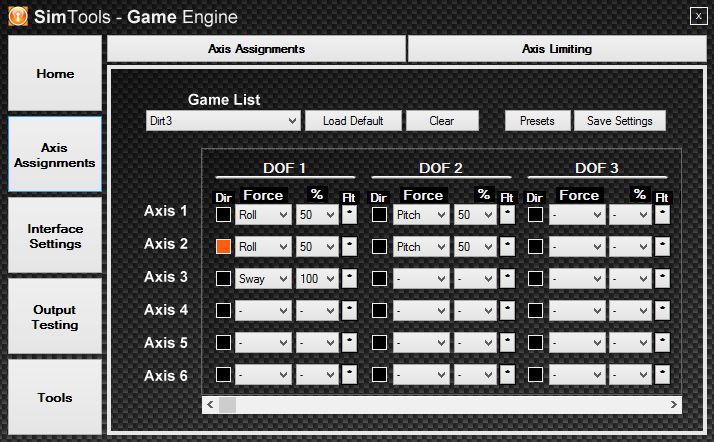
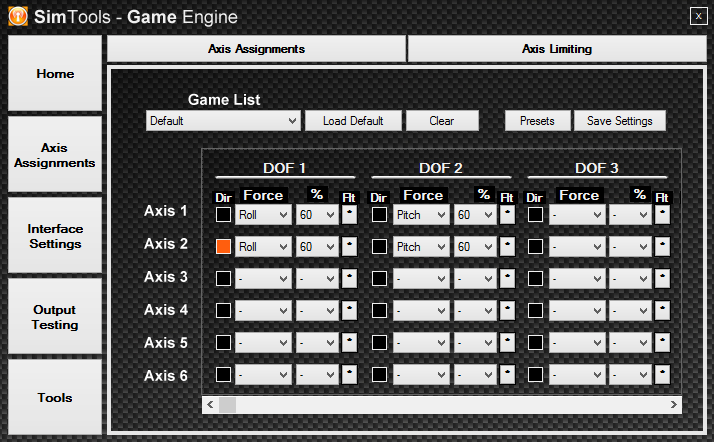
Now we can build an axis table that looks like this below. The default axis settings are used for any new game plugin that is installed later.
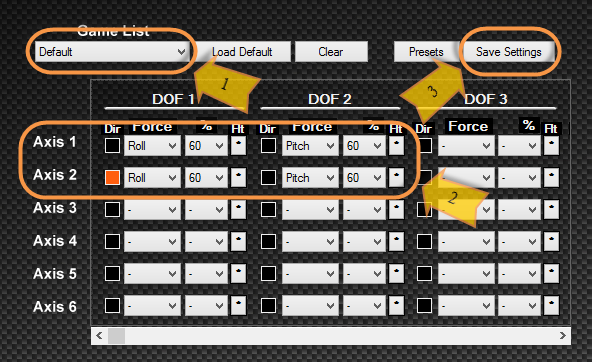
From this you can see that both axis pitches and move in the same direction to create a pitch down and up movement, and for roll they move in an opposite direction to create a roll movement.
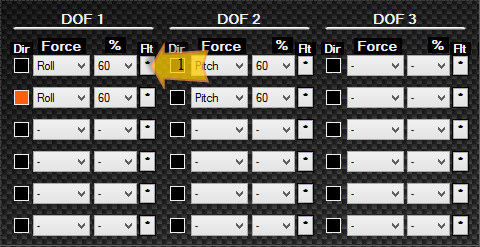
Method for setting the default axis settings:
Now we have just set our Default (Base) axis for all new games that are added to the Game Manager but remember we can always come back and change these values for a specific game.
Now what we have actually set in the above Default Axis profiles is for our sim to use 60% of the actuators movement to Roll (Tilt left to right) and to use 60% of the actuator travel to Pitch(tilt forward and backward) and both Roll and Pitch act on both Axis(motors). Please not if only one Axis(motor) controls the Pitch and one controls the Roll you will need to change the Default Axis to represent this.
Due noted that we haven’t included any Surge (longitudinal) and Sway (lateral) or Heave (vertical) to our default axis settings this can be done as well by adding it to the default profile to create a true motion cue.
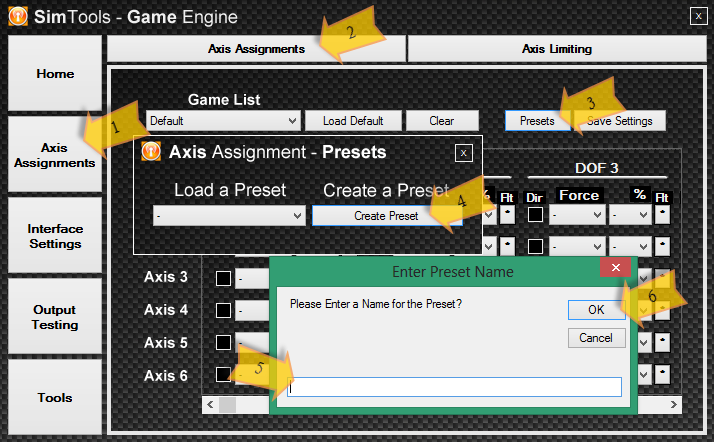
This also can easily be set by using the supplied presets or from a preset that someone has sent you. This can be handy when copying some else’s design and wish to use the same setting as they have. We will explain below how to select a preset and how to save your own if you wish to send it to someone to try and test.
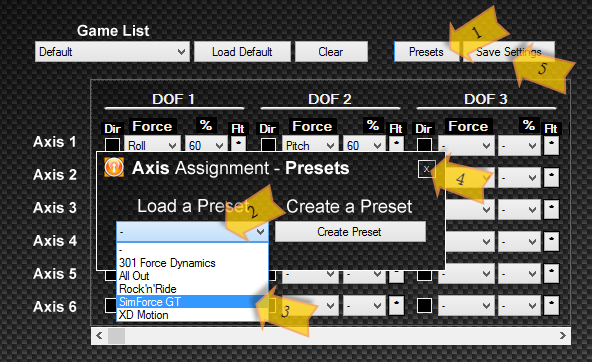
To use a supplied preset:
Now we have saved the above settings from the SimForceGT profile to our default axis profile. To be a perfect world we would have a list of all types of profile preset to use but to be fair we are able to create our own and save this so that we are able to send them to each other to make our journey through SimTools a pleasant one.
You will also notice there is a button under each DOF – Flt which is used to create a filter for each force within the Axis Assignments and can be handy when you refine your axis assignments to improve the feel to your personal requirements.
By pressing this button another window will pop up like this below:
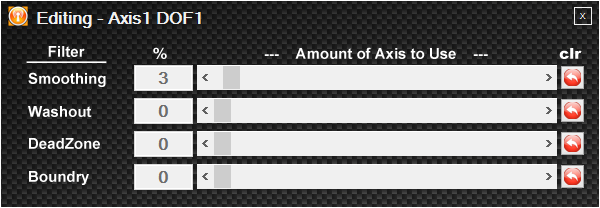
Smoothing – Will smooth the value, if a value seems jerky or not flowing this can be increased to add a smoothing effect by creating a mean value of the values coming in.
Washout – Is handy when we require a value to wash back to 0. i.e. like for a yaw axis that doesn’t actually turn a full 360 degrees. So to give the feeling to the rider that he/she is still actually turning.
Deadzone – Is for setting a deadzone in the middle of the movements i.e. around the 0, so if our Min Max in the tuning center is set to Max 10 Min 10 and we don’t want to feel 3-0-3 we can set a percent to represent this and take these values away from the equation, resulting in a deadzone on the middle of our axis movements.
Boundary – Is to make sure the single DOF does not use more than X amount of the available axis. In turn letting you have a very sensitive axis and will make sure it doesn’t take over the whole axis.
This simple process allows you to save your Axis Assignment settings to allow it to be sent to another user to easily select and install to their SimTools.
After setting all the axis assignment settings correctly:
[gard]
You will notice by pressing Presets and then Load a Preset in the following window, the name of the preset we have saved before will appear in the list. Ok now we need to know where we can retrieve this preset in order to be able to post this onto the website for others or in turn be able to email this to a fellow builder who has asked you for it.
Ok to recover our previous preset in order for us to send it to somewhere please take these following steps:
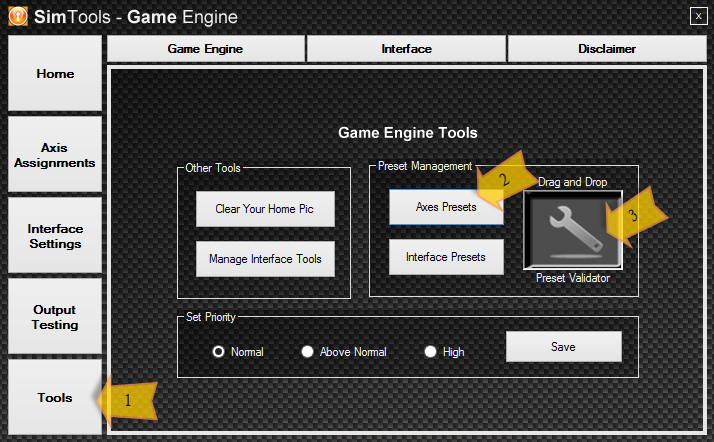
A file manager window will open and you are free to copy the preset to either a post on the web site or an email attachment. Once the person who asked for this or someone who has downloaded this then can apply this to their version of SimTools with these steps:
3. Simply drag and drop the file in question to the Preset Validator.
SimTools will validate it to be sure it is not corrupt and install it to the correct location and now can be selected by the user to use or just to check if they got theirs right.
Here we can simply set some safety limits in our axis, mainly used for SCN5/6 output as you don’t want the internals smashing against the outer shell which will result in early failure of the very expensive drivers and you may not be able to get a replacement on warranty.
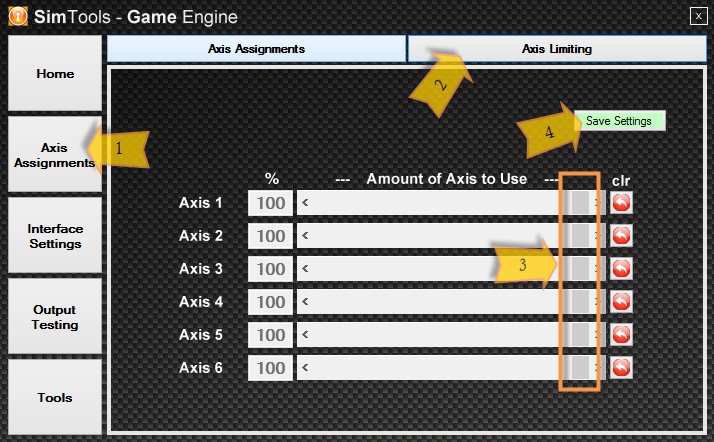
Now this will limit the maximum distance the axis will travel if set right will never reach their internal end stop and damage them and this can be revisited and changed if required.
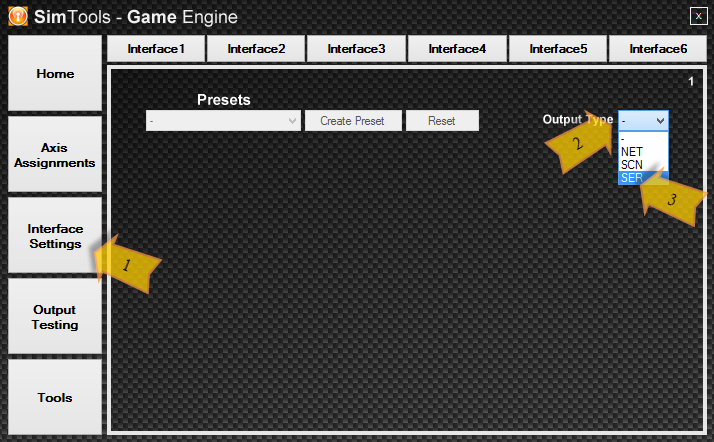
The first time clicking on this button might not look like you’re in the right place. Here we can setup our Interfaces, i.e. Motor controller, SCN Controllers and Microcontrollers even set our Interfaces that are connect to the Game Engine PC via the network.
Allowing us to set them all up in one place.
In the top button bar you will notice we can setup six interfaces for the Game Engine to control therefore we can control six interfaces for a 6DOF simulator.
There is also presets already setup and ready for you to just select and go, can save some time and this makes it easier for you if you have one of these supported interfaces. Alongside this too is where you select the type of Output, being Net – An interface that needs to be connected via a IP Address, SCN – for using the SCN5/6 from Mirai Inter-tech and last of all Ser – Serial connected device.
Once you have selected Net from the Output Type box you will be given a screen that looks like this:
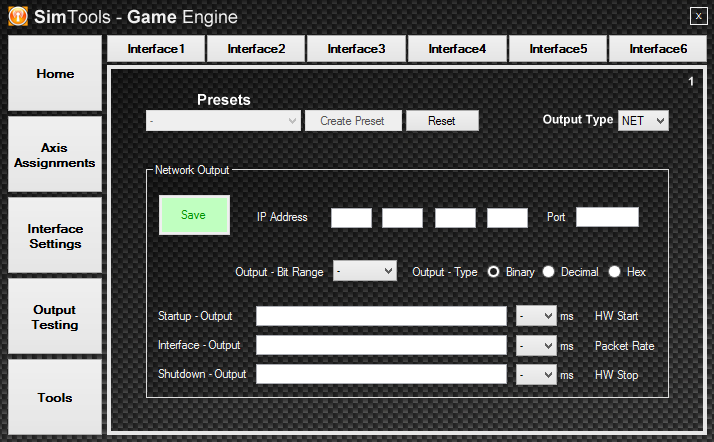
To explain all the areas:
Once you are happy with the interface please press Save to save the setting to the Game Engine. On another note it can be handy to Create a Preset with this existing settings in order to send this to another user who has the same device but not the knowledge on how it needs to be setup.
If more than one Net Interface is used you can then select from the top button bar the next Interface and continue to set it up like above.
Once you have selected SCN from the Output Type box you will be given a screen that looks like this:

To explain all the area:
Again please press Save in order to save these setting to the game engine, and if another one need to be setup, simply click the next Interface in the top button bar and continue to setup like listed above.
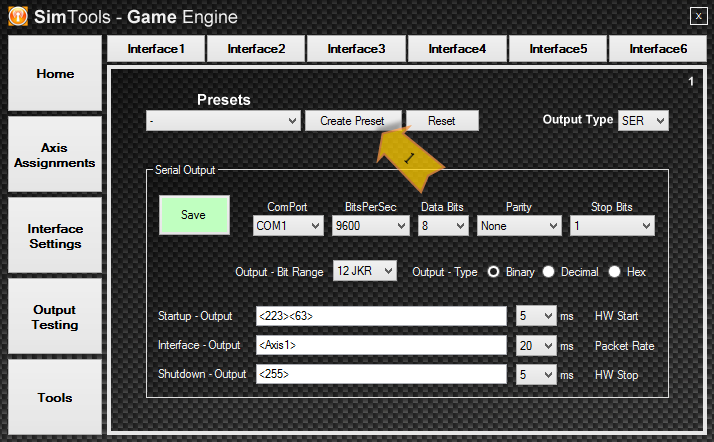
Once you have selected Ser from the Output Type box you will be given a screen that looks like this:
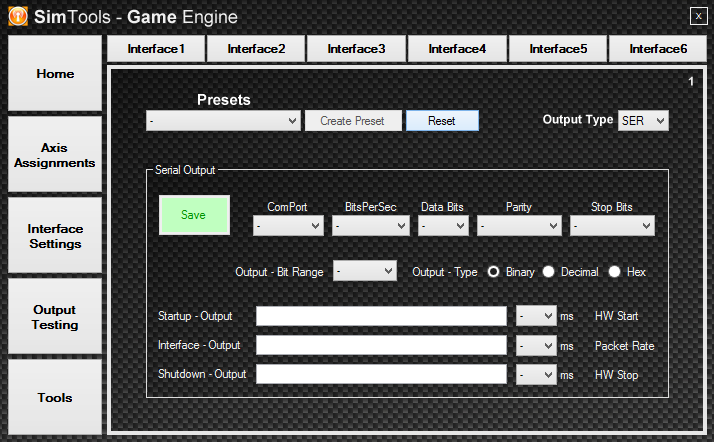
To explain all the areas:
Again please press Save in order to save these setting to the game engine, and if another one is needed to be setup, simply click the next Interface in the top button bar and continue to setup like listed above.
For an example we will step you through an example of a preset supplied with SimTools, others may be added in the future when they show they will be used often enough to include, Developers of custom interfaces can provide a setting file in their post on the site to make this easier for new people to use their custom interface too.
Ok now to setup a Jrk as follows:
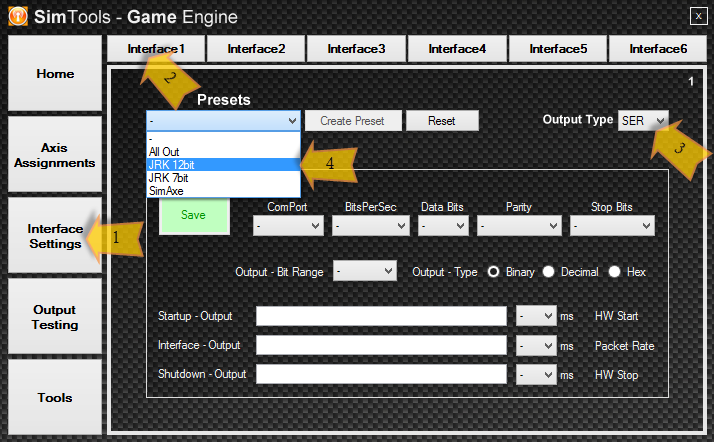
You will notice it will fill in the fields below as needed but is not totally complete. You still need to change a couple of things. As noted below:
Once happy with all your settings click Save to save the settings to the Game Engine. You can do the same as above to set another Interface if more than one Jrk is needed noting that you need to select the next interface and not overwrite the one you have just done.
This simple process allows you to save your interface settings to allow it to be either sent to another user or to be posted on the web site so they can easily select and install to their SimTools.
After setting all the interface’s setting correctly:
Another window will appear and then:
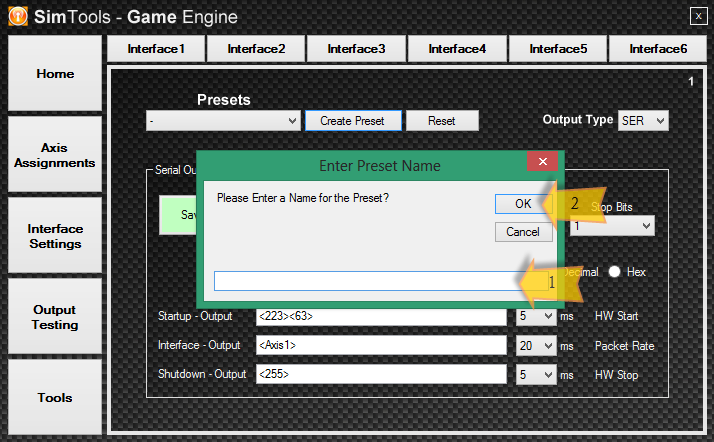
You will notice the new saved preset will now appear in the Presets drop down box.
Ok now to retrieve this preset and send it to someone that may need it:

Now a file manager window will appear and the preset that you have saved will appear here, this then will allow you to copy this or attach it to an email to send to someone who may need this.
They in turn just need to drag and drop this preset to the same area as where you opened the directory and place it in the Preset Validator, from there Sim Tool will take over check that the format is correct and then moves it to the right place that is needed. Then the user can continue back to the Interface Settings and now can select the preset that you have sent or posted on the website.
Now this is an important phase of setting up, you will need to test the output to the interfaces so that you know that the directions do as they were applied and match what is needed by the Game Plugins in order to move your sim in the correct way.
If your settings in the Interface Settings are set correctly your interfaces should show they are receiving data and most will come to their center positions and await the next command. Now there is actually two options for testing the output and are explained below:
This is the default option already selected and as it actually looks this allows you to simulate the roll, pitch, etc. as if it was receiving these values from the game plugin, and please note it uses the default axis settings from the Axis Assignments and if you have not set the Roll there the roll here will not affect the sim at all. Now by moving the sliders you can test the directions and make sure that they match the direction set in the SimTools Co – ordinate System. Please note that the clr button resets the value to 0 which should be your center.
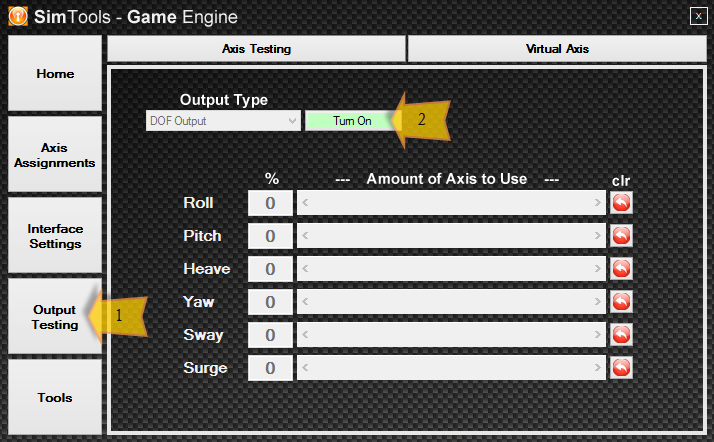
The second option can be found by selecting it from the Output Type drop down box.
This will allow you to test each axis individually and is handy to make sure each axis is moving to its correct limits and can re center itself properly and repeats this.
Once you are happy that it actually moves in all the correct ways simply Turn Off to exit.
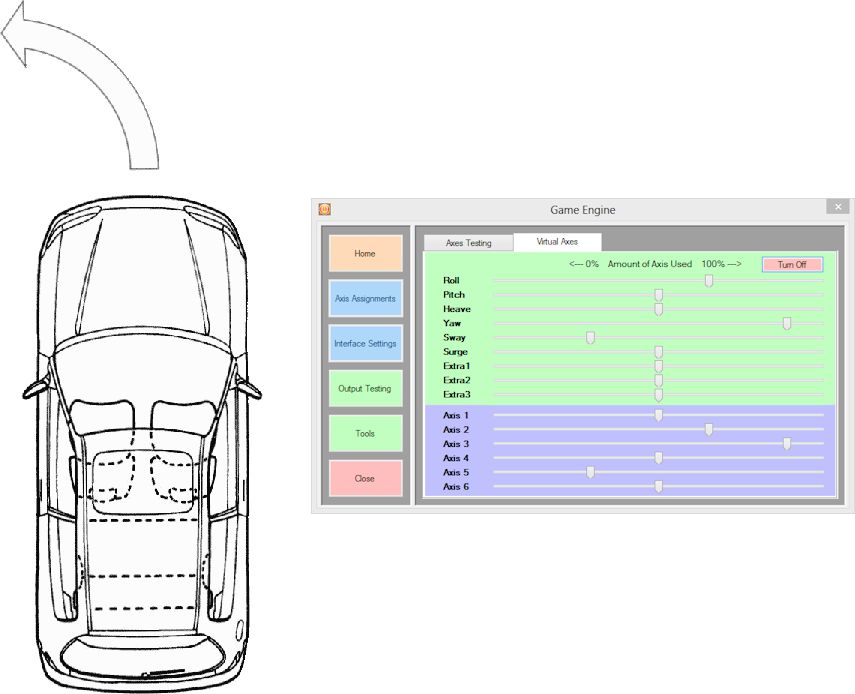
The virtual axis can be a very handy tool to check that the data coming in from the plugin is actually moving the track bars in the right manner to what is set out in our Co-ordinate system.
If you find that they do not comply please post a polite comment to the developer listed with in the plugin so that they may change to this, if this co-ordinate system is not followed it will make it hard for people to make sure their Axis Assignment’s for each game are correct.
A note to existing and new plugin developers, please make sure your plugin match the Co-ordinate system that is in place, makes it so much easier for everybody else.
You need to use with the game running and is better with the game running in a window on a single screen system:

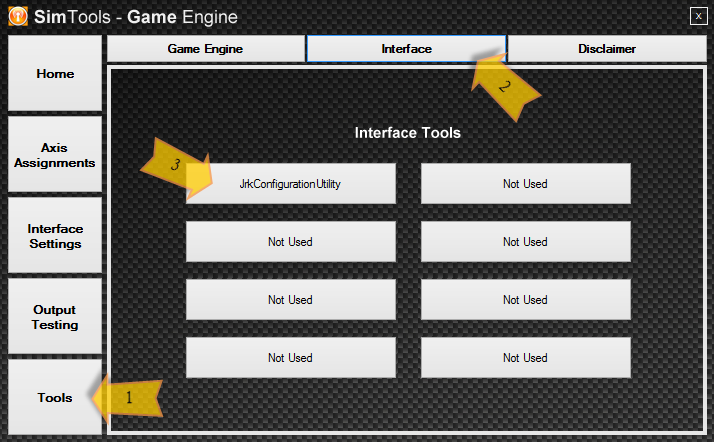
Provided with the Game Engine is a set of simple tools that make doing certain tasks a lot easier and contains three sections. These sections can be each selected from the top button bar and are listed as the following:
Some of these tools have already been detailed above and we will only detail the ones that were missed.
As the name states this allows us to set Windows Shortcuts that may help us to setup our interfaces and may include motor driver applications and specialized dash board application, or any other application that you want to run with your Simulator.
Please to make things easier send shortcuts to the desktop of the application you wish to include on the possible eight buttons then add them with the following steps to SimTools:

Now how do we use the previously installed Windows Shortcuts ?
The Shortcuts become buttons with in the SimTools Game Engine’s – Tools section.
Now these buttons will automatically update themselves and can be changed any time by simply redoing the steps above.
To gain access to these Buttons we:
A nice easy way to access our extra stuff from within SimTools.
You have to edit one of the core files of WordPress to get rid of the WordPress link in the widget box or you have to use any of the custom meta widget plugins which are available.
Use the core method:
Go to /wp-includes/ and edit default-widgets.php
Search for „wordpress.org“ and you find the corresponding line. You have to comment out the complete line like this:
<?php /*echo apply_filters( 'widget_meta_poweredby', sprintf( '<li><a href="%s" title="%s">%s</a></li>',
esc_url( __( 'http://wordpress.org/' ) ),
esc_attr__( 'Powered by WordPress, state-of-the-art semantic personal publishing platform.' ),
_x( 'WordPress.org', 'meta widget link text' )
) ); */?>
Everytime you update your WordPress installation you have to repeat this step as WordPress overwrites your changes, so its recommend to use the second method:
Use the plugin method:
Get a custom widget plugin here:
absatz
Once you have your model, make sure it moves as expected with the sliders and save a copy.
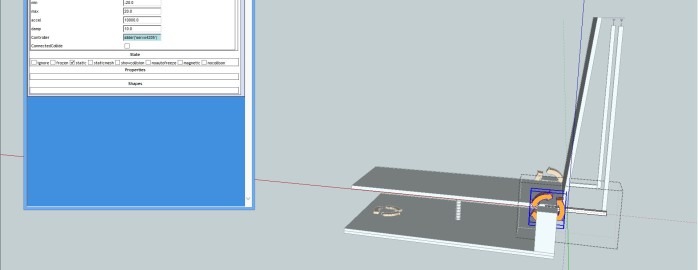
Select one of your servos and click on „UI“ to show the SketchyPhysics Inspector:
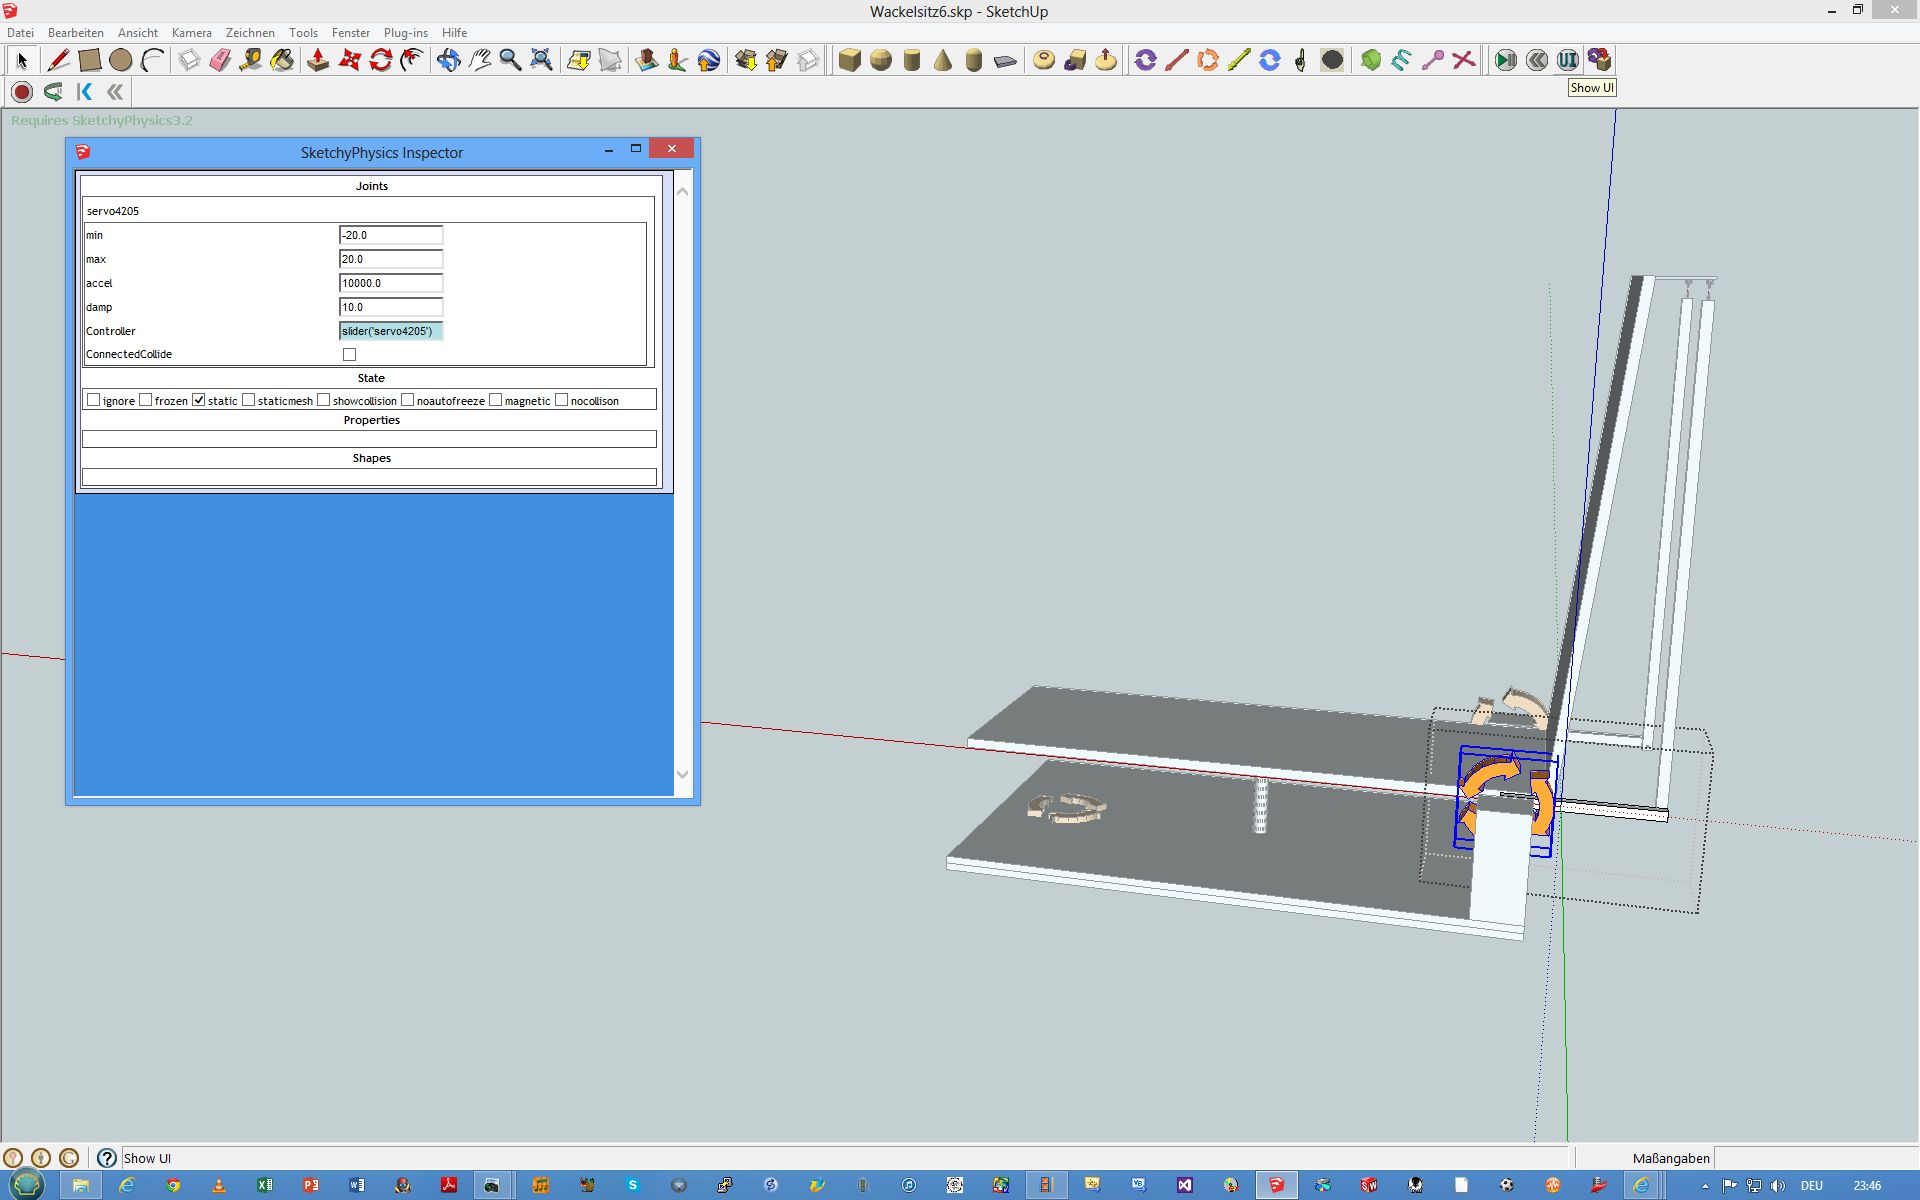
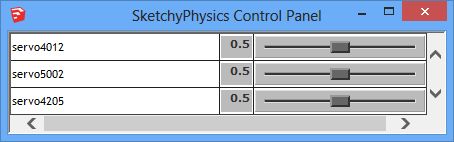
Under „Controller“ you will find something like „slider(’servo4205′)“. Replace this with „$axis1“. This is our new global variable, that will be used to drive the servo instead of the slider. Repeat for all servos and replace the slider names with „$axis2“, „$axis3“, etc. When all done the SketchyPhysics Control Panel should be empty (or at least no liders for your servos) when clicking Play/Pause. Save the model and close SketchUp.
In GameEngine setup your interface to Output Type: NET. When running GameEngine and SketchUp on the same computer enter 127.0.0.1 as IP address (otherwise the IP address of the PC that runs SketchUp) and Port 3157. Output – Bit Range shall be 8 and Decimal. In the Interface – Output field enter the axis you want to assign to the servos in SketchUp, separate the axis with „;“. Then click Save.
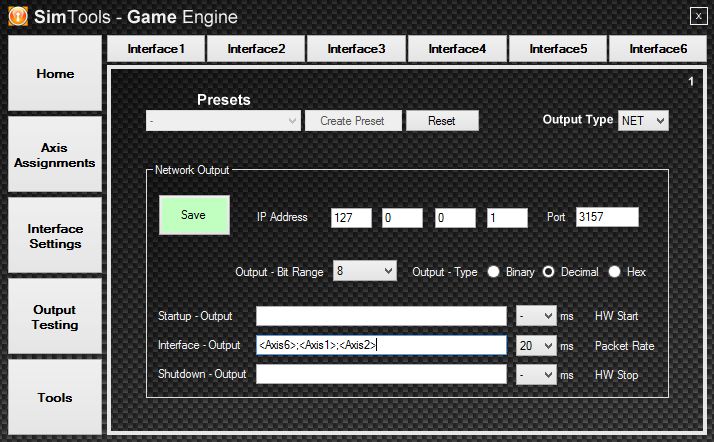
Here my axis settings for the model attached:
Now to send the data from SimTools to SketchUp we’re going to use the Ruby API of SketchUp. Again, I’m not going into the details, as there is plenty of material available on the net. What you need though is a copy of socket.so of Ruby version 1.86 as this is what SketchUp works with. Other versions most probably will not work. Put this file into the SketchUp plugins folder (C:\Program Files (x86)\Google\Google SketchUp\Plugins). Create a text file in the same folder with the ending .rb. Copy the following code into this text file and save it:
require 'socket.so'
socket = UDPSocket.new
socket.bind("127.0.0.1", 3157)
timer_id = UI.start_timer(0.01, true) {
    message, sender = socket.recvfrom_nonblock(100)
    message1, message2, message3 = message.split(";")
    $axis1 = message1.to_f / 256.0
    $axis2 = message2.to_f / 256.0
    $axis3 = message3.to_f / 256.0
}
If not done already start up GameManager and your game of choice. Check if everything works to your satisfaction and open the SketchUp model. The Ruby script is automatically loaded at the start. So click on Play/Pause and see your simulator model dancing when driving your car!
Easy, isn’t it?
If you want to try immediately I have attached a file containing a SketchUp model and the Ruby script to the resources. You also need to install SketchyPhysics from here.
Thanks to James Bradwell, who has inspired me to set up SketchUp with SimTools!
Installing SimTools
http://www.xsimulator.net/simtools-download/
Now that we have downloaded SimTools open, the archive that you have received and then double click the icon to open the file browser in order to install the application.
Now to continue, Double Click SimTools_vx.x.exe in order to start installing it.
Click Next to continue, please read the Licence Agreement and if you agree please check the radio button I accept the agreement then Next.
Next you will be asked to select the destination location, please change if you wish to install SimTools to a different location. The manual uses the default location and you will need to remember this location when we refer to the installation directory.
Once you have selected your destination directory click Next to continue. Ok the next part needs to be considered carefully, options are:
Once you have selected the components to install, please set the menu name that you wish to appear in the Start menu and click Next.
Next is the option to create a desktop icon (recommended) or to create a Quick Launch icon.
Click Next once you have selected one or both. Then in the Ready to Install you can check on everything you have selected previously and if any changes needed feel free to click “Back” to make any changes necessary.
Once happy with you selections continue to install by clicking Install. SimTools will then install as per your requests. At the end of this there will be another two options that we recommend leaving so one may check the application has successfully installed plus helps to familiarize yourself with the way it is laid out.
Now if using a second PC you will need to follow the above instructions but select 3 if you are now installing SimTools on the game machine, or vice a versa. If you are only planning to playing Live for Speed© you are ready to start setting up your default axis
[gard]
The Game Engines main task is to drive your simulator from the game values that the Manager is sending. Plus setup and manage any interfaces that you have setup.
Contained in the Game Engine we have a button list on the right hand side as follows:
The Game Managers main task is to patch games and transfer this information to the Game Engine for processing to the Interfaces setup by your settings and for creating game profiles and setting up the of the Game Dash.
The buttons contained in the Game Manager have the following functions: